This is continued from Make a note taking app with Firestore - Part 1.3 Firestore
Background
I want to able to see and take note on my mobile phone also, and the content will be synced between mobile application and web application. The process is very similar to how we create the web application, thanks to the similarity between ReactJS and React Native.
What to do?
1. Create the React Native mobile application
Run this command to create the project:
npx react-native init WriteItDown --template react-native-template-typescript --directory write-it-down-app
You should have a directory named write-it-down-app now. You can open it with your favourite IDE. To check your React Native web application is working, run this command to start the app in Android emulator:
npm run android
It should open the Android emulator automatically and you should see a Welcome to React screen. Now we can start writing code.
2. Add login capability to the mobile application
Run this command to add the necessary dependencies:
npm i @react-native-firebase/app @react-native-firebase/auth @react-native-firebase/firestore @react-native-community/google-signin
If you try to run the application on Android emulator now, you should see the following error message:
* What went wrong:
Execution failed for task ':app:mergeDexDebug'.
> A failure occurred while executing com.android.build.gradle.internal.tasks.Workers$ActionFacade
   > com.android.builder.dexing.DexArchiveMergerException: Error while merging dex archives:
     The number of method references in a .dex file cannot exceed 64K.
     Learn how to resolve this issue at https://developer.android.com/tools/building/multidex.html
You can click on the link to read more about the issue. Basically it means your application is too big and you need another way to build it. We will enable the multidex capability to resolve this issue. Open ./android/app/build.gradle and add these:
    defaultConfig {
        applicationId "com.writeitdown"
        minSdkVersion rootProject.ext.minSdkVersion
        targetSdkVersion rootProject.ext.targetSdkVersion
        versionCode 1
        versionName "1.0"
        multiDexEnabled true
    }
dependencies {
    implementation fileTree(dir: "libs", include: ["*.jar"])
    //noinspection GradleDynamicVersion
    implementation "com.facebook.react:react-native:+"  // From node_modules

    implementation "androidx.swiperefreshlayout:swiperefreshlayout:1.0.0"
    implementation 'androidx.multidex:multidex:2.0.1'

    implementation(project(":react-native-google-signin"))

    debugImplementation("com.facebook.flipper:flipper:${FLIPPER_VERSION}") {
      exclude group:'com.facebook.fbjni'
    }

    ...
Then open ./android/app/src/main/java/com/writeitdown/MainApplication.java and change these:
...
import java.lang.reflect.InvocationTargetException;
import java.util.List;

import androidx.multidex.MultiDexApplication;

public class MainApplication extends MultiDexApplication implements ReactApplication {

  private final ReactNativeHost mReactNativeHost =
      new ReactNativeHost(this) {
        @Override
        public boolean getUseDeveloperSupport() {
          return BuildConfig.DEBUG;
        }

        ...
Then we change ./android/settings.gradle to support for Google Signin:
rootProject.name = 'WriteItDown'
apply from: file("../node_modules/@react-native-community/cli-platform-android/native_modules.gradle"); applyNativeModulesSettingsGradle(settings)
include ':react-native-google-signin', ':app'
project(':react-native-google-signin').projectDir = new File(rootProject.projectDir, '../node_modules/@react-native-community/google-signin/android')
Now we should be able to run the application on Android emulator. Next we add a React Context for storing login related details. Put these in ./src/contexts/LoggedInContext.ts :
import React from 'react';
import { FirebaseAuthTypes } from '@react-native-firebase/auth';

const LoggedInContext = React.createContext<Partial<{
    user: FirebaseAuthTypes.User | null,
    clear: () => Promise<void>,
}>>({});

export default LoggedInContext;
This will store the user details and the function to logout the user. Now we add a login page, which will be shown if the user is NOT logged in yet. We need to get a web client ID from the Firebase console.
Goto Authentication > Sign-in method > Google > Web SDK configuration and you should see the web client ID:
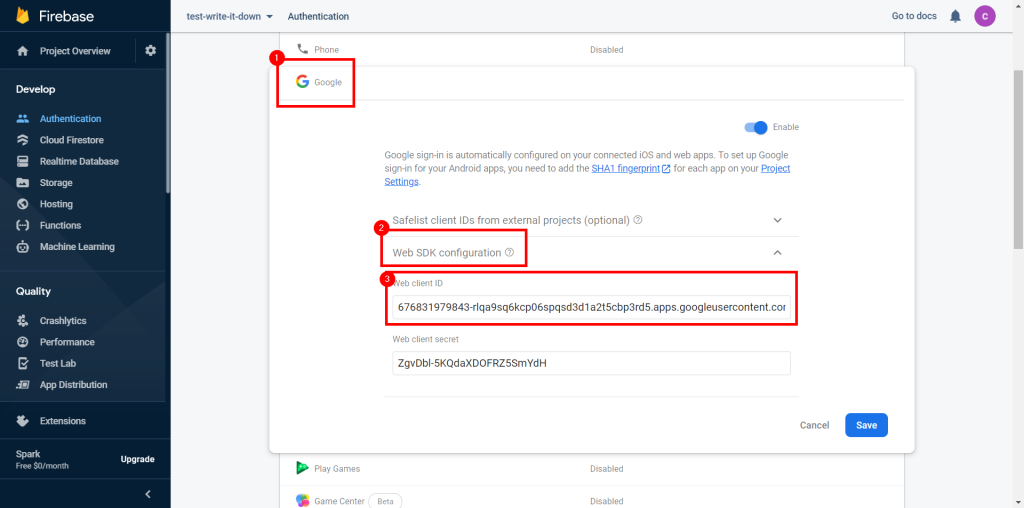
Copy the web client ID and put these in ./src/components/LoginPanel.tsx :
import React from 'react';
import { Text, View } from 'react-native';
import { GoogleSigninButton, GoogleSignin } from '@react-native-community/google-signin';
import auth from '@react-native-firebase/auth';

GoogleSignin.configure({
    webClientId: '<your-web-client-id>',
});

const LoginPanel = () => {
    const login = async () => {
        await GoogleSignin.hasPlayServices();
        const user = await GoogleSignin.signIn();
        auth().signInWithCredential(auth.GoogleAuthProvider.credential(user.idToken));
    };

    return (
        <View
            style={{
                flex: 1,
                justifyContent: 'center',
                alignItems: 'center',
            }}>
            <Text accessibilityLabel="Title text" style={{
                fontSize: 20,
                fontWeight: 'bold',
            }}>Write it down</Text>
            <GoogleSigninButton onPress={login} />
        </View>
    );
};

export default LoginPanel;
This will show the title and the login button in the middle of the page. Now we add a dummy home page, which will be shown if the user is logged in. Put these in ./src/components/HomePanel.tsx :
import React, { useContext } from 'react';
import { Button, View, Text } from 'react-native';
import LoggedInContext from '../contexts/LoggedInContext';

const HomePanel = () => {
  const loggedIn = useContext(LoggedInContext);

  const logout = () => {
    loggedIn.clear?.apply(null);
  };

  return (
    <View
      style={{
        flex: 1,
        justifyContent: 'center',
        alignItems: 'center',
      }}>
      <Text accessibilityLabel="Title text" style={{
        fontSize: 20,
        fontWeight: 'bold',
      }}>Write it down</Text>
      <Button title="Logout" onPress={logout} />
    </View>
  );
};

export default HomePanel;
This will show a title and a logout button. Now we change the entry point to show the corresponding page based on the login status. Put these in ./App.tsx :
import React, { useEffect, useState } from 'react';
import LoginPanel from './src/components/LoginPanel';
import HomePanel from './src/components/HomePanel';
import LoggedInContext from './src/contexts/LoggedInContext';
import { GoogleSignin } from '@react-native-community/google-signin';
import auth, { FirebaseAuthTypes } from '@react-native-firebase/auth';

const App = () => {
  const firebaseAuth = auth();
  const [user, setUser] = useState<FirebaseAuthTypes.User | null>();

  const logout = async () => {
    await GoogleSignin.revokeAccess();
    await GoogleSignin.signOut();
    await firebaseAuth.signOut();
  };

  useEffect(() => {
    return firebaseAuth.onAuthStateChanged((newUser) => setUser(newUser));
  }, [firebaseAuth]);

  return (
    <LoggedInContext.Provider value={{ user, clear: logout }}>
      {user === undefined ? null : user ? <HomePanel /> : <LoginPanel />}
    </LoggedInContext.Provider>
  );
};

export default App;
3. Setup Firebase for the mobile application
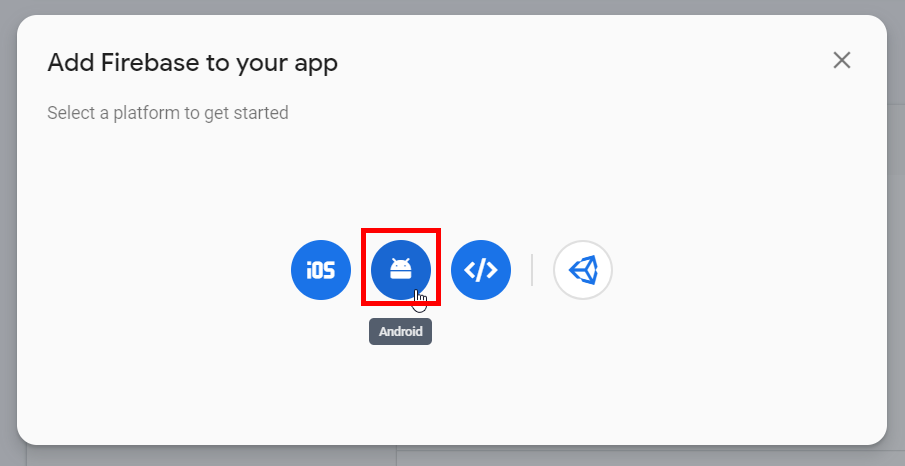
This login capability is not done yet. We need to configure the mobile application to use the Firebase. Open your Firebase console in the browser and go to the project settings. Goto Your apps section and click on the Android button to add a Android mobile application.
You can find the Android package name from ./android/app/src/main/AndroidManifest.xml :
<manifest xmlns:android="http://schemas.android.com/apk/res/android"
  package="com.writeitdown">

    <uses-permission android:name="android.permission.INTERNET" />

    ...
You can find the SHA-1 by running this command in ./android directory:
gradlew signingReport
...
> Task :app:signingReport
Variant: release
Config: debug
Store: <directory to your keystore>
Alias: androiddebugkey
MD5: 20:F4:61:48:...
SHA1: 5E:8F:16:06:...
SHA-256: FA:C6:17:45:...
Valid until: Wednesday, May 1, 2052
Fill in the details and click on Register App. Next download the google-services.json to ./android/app directory. Then change ./android/build.gradle to setup the Google Service Gradle Plugin:
    dependencies {
        classpath("com.android.tools.build:gradle:3.5.3")
        classpath 'com.google.gms:google-services:4.2.0'
        // NOTE: Do not place your application dependencies here; they belong
        // in the individual module build.gradle files
    }
And add these to ./android/app/build.gradle to apply the plugin:
task copyDownloadableDepsToLibs(type: Copy) {
    from configurations.compile
    into 'libs'
}

apply from: file("../../node_modules/@react-native-community/cli-platform-android/native_modules.gradle"); applyNativeModulesAppBuildGradle(project)
apply plugin: 'com.google.gms.google-services'
Now it's done. You can run this command to test everything:
npm run android
Next we will do Make a note taking app with Firestore - Part 2.2 Text editor