Background
The world is full of virus now. We should just stay at home but it's boring. I want to have an application that allow me to blow water with my friends with video.
What is the plan?
Make a web application for video conference.
How to start?
The browser has became a super sophisticated software that has all sort of functions inside. By using just <video> tag then you can have a video player in your web application. I will use these to make the web application.
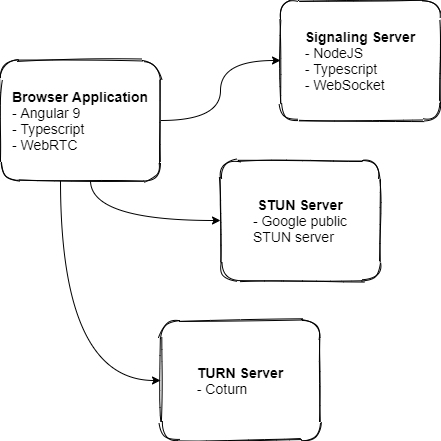
| Browser Application | This is the thing you see when you typed in http://www.something.com in your browser address bar. |
| Signaling Server | To exchange handshake message to initiate the video call. |
| STUN Server | To discover the public IP of the user machine so others can connect to it. |
| TURN Server | Everyone is behind a router nowadays. Direct connection won't be possible. This server will relay the traffic between the user machine. |
What to do?
Signaling Server
1. Setup Webpack
I like Typescript so I use Typescript whenever I can. First install npm on your machine, then setup a Webpack + Typescript project from scratch by running these commands in an empty directory:
echo {} > package.json
npm i -D webpack webpack-cli typescript ts-loader @types/node
This will install Webpack + Typescript for your project.
Next we setup Webpack by creating the ./ webpack.config.js file:
const path = require('path');

module.exports = {
    entry: './src/main.ts',
    module: {
        rules: [
            {
                test: /\.tsx?$/,
                use: 'ts-loader',
                exclude: /node_modules/
            }
        ]
    },
    resolve: {
        extensions: ['.tsx', '.ts', '.js']
    },
    output: {
        filename: 'main.js',
        path: path.resolve(__dirname, 'dist')
    },
    target: 'node',
    devtool: 'source-map'
}
This will setup the Webpack to compile ./src/main.ts into ./dist/main.js . The source-map is useful if you want the stack trace to show details on the original .ts file instead of the generated .js file.
Next we create an empty ./tsconfig.json because Webpack needs it.
{ }
Next we setup the ./package.json to run the output script then doing npm start command. Add these to the file:
{
    ...
    "scripts": {
        "start": "node ./dist/main.js"
    },
    ...
}
Now the setup is done. Next we just do a little check to make sure everything is really working. Create ./src/main.ts and put in some random code.
console.log('Hello Webpack!');
Run this command to build the project:
npx webpack
Run this command to run the project:
npm start
You should see Hello Webpack!
2. Write a HTTP server
The signaling server is a WebSocket server, which is based on a HTTP server. So first we write a HTTP server. NodeJS has everything ready. It's very simple to do that. You can use express to write a better HTTP server but I will just do a simple one here with builtin functions from NodeJS. Create ./src/main.ts and write these:
import * as http from 'http';

const server = http.createServer((request, response) => {
    // TODO handle-http-request
});
server.listen(8080);

// TODO implement-websocket-server

console.log('Server started');
The HTTP server is created to listen to port 8080. There's no MVC framework here so you will need to handle everything by your own. It's enough to my use. I want the HTTP server to be able to serve the files for my browser application. I need to helper library to determine the mime type from the file name because the browser will need it when receiving the file from the HTTP server. Install mime-type library with this commands:
npm i mime-types
npm i @types/mime-types -D
Add the import to the top of ./src/main.ts file:
import * as fs from 'fs';
import * as mime from 'mime-types';
Then replace the // TODO handle-http-request block with this code:
    const path = 'web' + request.url;
    if (fs.existsSync(path)) {
        const stat = fs.statSync(path);
        const actualPath = stat.isDirectory() ? path + '/index.html' : path;
        response.writeHead(200, { 'Content-Type': mime.lookup(actualPath).toString() });
        response.end(fs.readFileSync(actualPath));
    } else {
        response.writeHead(404);
        response.end();
    }
This will
- Serve files from ./web directory.
- Return the file content as response if the path points to a valid file.
- Return the file content of <path>/index.html if the path points to a valid directory.
- Otherwise return HTTP status 404, which means resource not found.
To make sure everything is really working, create ./web/index.html file:
<html><body>Hello HTTP server!</body></html>
Build the project and start it. Open http://localhost:8080 in your browser. You should be able to see Hello HTTP server!
If you want the Webpack to automatically rebuild when there's file changes, run this command:
npx webpack --watch
This will not restart the server if you already started it. You will need to restart the server manually.
3. Write A Websocket Server
I use websocket library to implement the WebSocket server. First, install the library with these commands:
npm i websocket
npm i @types/websocket -D
Add the import to the top of ./src/main.ts file:
import { server as WebSocketServer, connection } from 'websocket';
Replace the // TODO implement-websocket-server with this code:
const wsSessions: { [room: string]: { [id: string]: connection } } = {};
let sessionIdCounter = 0;

const wsServer = new WebSocketServer({
    httpServer: server,
    autoAcceptConnections: false
});
wsServer.on('request', request => {
    // TODO handle-new-websocket-connection
});
This will:
- Create a room list to store WebSocket sessions for each room. I have to be able to have private blow water session with my friends so I want a room.
- Create a counter for session ID so I can assign an unique ID to each WebSocket session.
- Create a WebSocket on top of the HTTP server created previously.
- Do something when there's a new incoming WebSocket connection.
Next we write code to handle the new incoming WebSocket connection. Replace // TODO handle-new-websocket-connection block with this code:
    const pathMatch = request.resource.match(/^\/room\/([^\/]+)$/);
    if (!pathMatch) {
        request.reject(404);
        return;
    }

    const room = pathMatch[1];
    if (!wsSessions[room]) {
        wsSessions[room] = {};
    }

    const ws = request.accept();
    const sessionId = ++sessionIdCounter;
    wsSessions[room][sessionId] = ws;

    // TODO handle-websocket-open

    ws.on('message', message => {
        // TODO handle-websocket-message
    });

    ws.on('close', () => {
        // TODO handle-websocket-close
    });
This will:
- Only accept the WebSocket connection if the path is /room/{roomId} .
- Create a room in the WebSocket session list.
- Assign an unique ID to the WebSocket session.
- Store the WebSocket session in the room.
To make sure everything is working fine, we need to install a WebSocket client to check it. I use Simple WebSocket Client browser extension to do it. First, we make the Websocket to send something so we know it's working. Replace the // TODO handle-websocket-open block with this code:
ws.send('Hello WebSocket server!')
Build the project and start it. Connect to ws://localhost:8080/room/123 and you should see Hello WebSocker server!
Revert the changes after done testing.
4. Handle participant joining and participant leaving
To handle participant joining, replace // TODO handle-websocket-open block with this code:
    ws.send(JSON.stringify({
        type: 'participant-list',
        you: sessionId,
        all: Object.keys(wsSessions[room]),
    }));
This will send the ID of all participants in the room to the connecting client. It will also send the ID of the connecting client so he/she knows who he/she is.
To handle participant leaving, replace // TODO handle-websocket-close block with this code:
        delete wsSessions[room][sessionId];
        const message = JSON.stringify({
            type: 'participant-leave',
            from: sessionId,
        });
        Object.values(wsSessions[room]).forEach(s => s.send(message));
This will:
- Remove the WebSocket session from the room.
- Tell everyone this participant is leaving.
5. Handle other messages
The server will not care about other messages. It will just pass it to the target participant or to everyone depends on the to field in the JSON payload. The browser application will handle it. Replace // TODO handle-websocket-message with this code:
        if (message.type == 'utf8') {
            const command = JSON.parse(message.utf8Data) as { to?: string };
            if (command.to) {
                if (wsSessions[room][command.to]) {
                    wsSessions[room][command.to].send(message.utf8Data);
                }
            } else {
                Object.values(wsSessions[room]).forEach(s => s.send(message.utf8Data));
            }
        }
This will:
- Only handle text message. WebSocket is capable to transfer text message and binary message.
- If there's value in the to field of the JSON payload, send it only to the specific participant.
- Otherwise, send it to everyone.
That's it for the signaling server. You can use a WebSocket client to test it out.
Next I will talk about the browser application .