This is continue from part 1 .
Browser Application
1. Setup Angular
Setup a Angular project from scratch by running these commands in an empty directory:
echo {} > package.json
npm i @angular/cli -D
npx ng new blow-water-ui --directory . --force --defaults
To make sure everything is working fine, run this command to start the browser application:
npm start
You should see the message open your browser on http://localhost:4200/ . Open the URL in your browser. You should see a sample Angular application.
2. Design the JOIN ROOM PAGE
We need a page to prompt for room number and a page to host the video conference. First we will add in some required modules to the project. Open ./src/app/app.module.ts in your editor. Add the import to the top of the file:
import { FormsModule } from '@angular/forms';
Add FormsModule to the module imports section:
@NgModule({
  ...
  imports: [
    ...
    FormsModule
  ],
  ...
})
Then we can start design our UI. We will design the prompt page first. Open ./src/app/app.component.html in your editor. Remove everything inside and replace with these:
<div *ngIf="page == 'setup'">
    <div>Please enter the room name</div>
    <input type="text" [(ngModel)]="room" (keydown.enter)="join()" />
</div>
This will create a label and a textbox for the participant to enter the room number. Participant will join the room when press Enter in the textbox. The page will be shown only the page variable is setup . By changing the page variable, we can create a simple mechanism to show different Angular component as different page.
Next we will write the logic behind this. Open ./src/app/app.component.ts in your editor and replace the content in the AppComponent class with these:
export class AppComponent {
  page = 'setup';
  room: string;

  private ws: WebSocket;

  join() {
    const url = new URL(location.href);
    this.ws = new WebSocket(`${url.protocol.replace(/^http/, 'ws')}//${url.host}/room/${this.room}`);
    this.ws.onmessage = ev => this.processWebSocketMessage(JSON.parse(ev.data));
    this.page = 'room';
    document.body.style.background = '#000';
  }
}
This defines the variables needed for the prompt page. The join function is invoked when the participant press Enter in the textbox. The join function will
- Construct the URL to the signaling server from the current address.
- Connect to the signaling server via WebSocket.
- Set the message handler to processWebSocketMessage function.
- Change the page to room .
- Set the background color to black.
Next we will create the processWebSocketMessage function. Add these after the join function:
  private processWebSocketMessage(message: { type: string }) {
    switch (message.type) {
      case 'participant-list': this.processParticipantList(message as any); break;
    }
  }
This will handle all the message based on the type field. For now we only handle participant-list message. Once connected to the signaling server, the server will send the participant-list message to the client. That will invoke the processParticipantList function.
To make sure everything is working fine, we can create a simple processParticipantList function to dump the message to the browser. We will put in the real implementation later. Add the function like this:
  private processParticipantList(message: any) {
    document.body.style.background = '';
    document.body.innerText = JSON.stringify(message);
  }
We will need to make sure the Angular project is hosted by the signaling server for it to construct the correct WebSocket URL because we set the WebSocket to connect to the same server that host the Angular application.
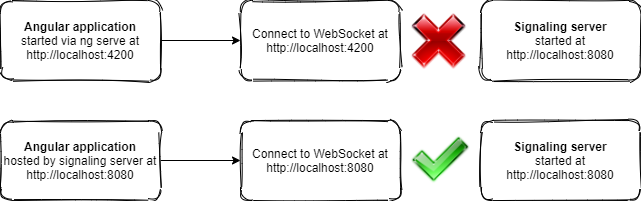
We cannot use ng serve to run the Angular project. Instead we compile it into the ./web directory of the signaling server:
npx ng build --watch --output-path <signaling server>\web
The --watch argument is to instruct the Angular CLI to rebuild when there's any file changes so you don't have to run this command manually to compile the project. Start the signaling server and open http://localhost:8080 in the browser. Enter any room number and press enter. You should see a participant-list JSON payload in the browser. If you open a new browser and join the same room, you will see the participant list contains more entries.
3. Design the message chat box
We will design the UI for the video conference before going into the logic. Open ./src/app/app.component.html in your editor. Add these at the end of the file:
<div *ngIf="page == 'room'">
    <!-- TODO video panel -->
    <div class="info-panel">
        Room {{room}}
    </div>
    <!-- TODO message panel -->
</div>
This will create a page that only appear if page variable is room . It will also show the room number.
Now we add the message panel to the page so the participant can chat via text message. Replace the <!-- TODO message panel --> block with these:
    <div class="message-panel">
        <div class="message-list">
            <div *ngFor="let message of messages"><span>{{message}}</span></div>
        </div>
        <div class="message-input">
            <input type="text" [(ngModel)]="input" (keydown.enter)="send()" placeholder="Message..." />
        </div>
    </div>
This will create a list of messages and a textbox for sending message to other participants. The participant can send the text message by pressing Enter in the textbox.
Next we will write the logic behind this. Open ./src/app/app.component.ts in your editor and add these to the AppComponent class:
  messages: string[] = [];
  input: string;

  send() {
    if (this.input) {
      this.ws.send(JSON.stringify({ type: 'text-message', from: this.me, content: this.input }));
      this.input = '';
    }
  }
The send function will be invoked when the participant press Enter in the textbox. It will send a text-message message together with the content to all the participants in the room. The other participants will need to handle this message to show it in the browser.
Modify processWebSocketMessage function to redirect text-message to processTextMessage function:
  private processWebSocketMessage(message: { type: string }) {
    switch (message.type) {
      ...
      case 'text-message': this.processTextMessage(message as any); break;
      ...
    }
  }
Add processTextMessage function after the send function to handle the text-message message:
  private processTextMessage(message: { from: string, content: string }) {
    this.messages.push(`[${message.from}] ${message.content}`);
    setTimeout(() => this.messages.shift(), 5000);
  }
This will push the text message context into the message list so it will appear in the UI. It also remove it after 5 seconds so it doesn't clutter the screen. This is a video conference web application. The UI will be filled with the face of the participants. I don't want to cover it with text messages.
To make sure everything is working fine, we replace the processParticipantList function with empty body so it doesn't clear the browser content. If you are using --watch argument to build the Angular project, you should be able to see the latest changes by just refreshing the browser.
Now you should be able to text everyone in the same room.
Next I will talk about the video conferencing capability .