This is continued from AWS CloudFormation: 01 - Create a web server EC2 instance .
Background
I want to scale my web server horizontally.
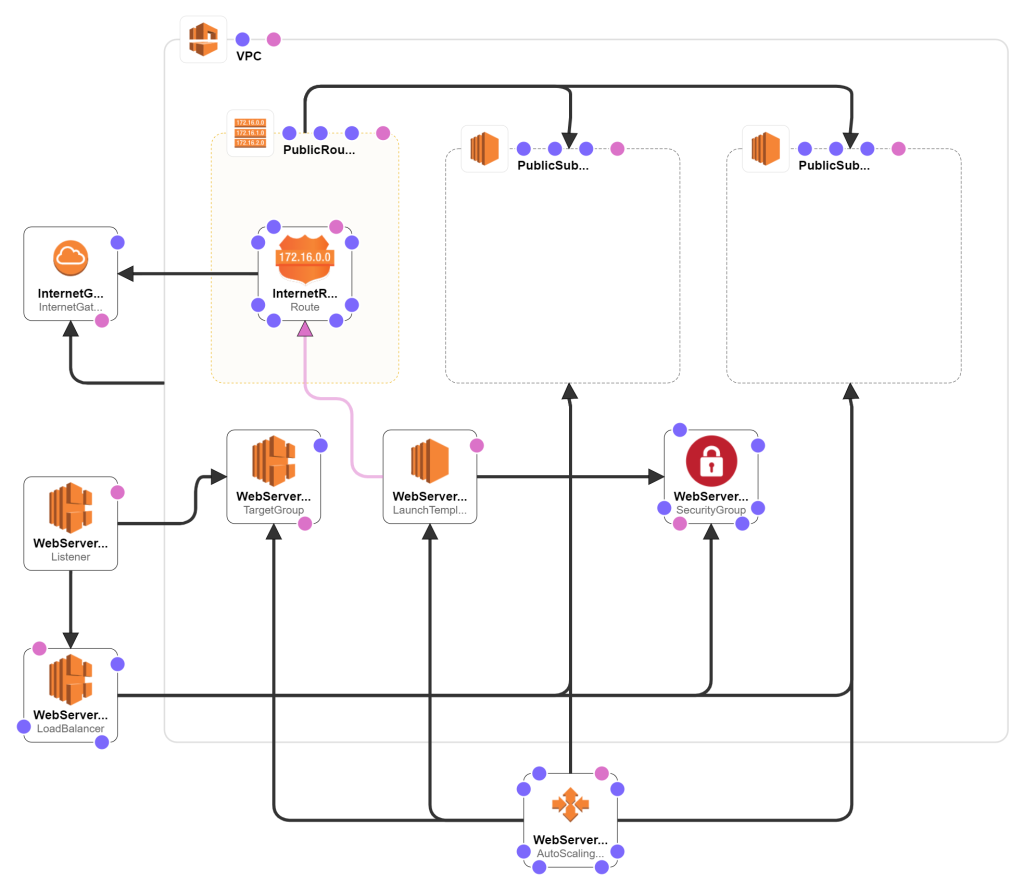
What we need?
- A launch template to launch an EC2 instance when needed.
- A load balancer to route traffic to multiple EC2 instances.
- A auto scaling group to control the amount of running EC2 instances.
How to do it?
This is what we are going to do:
Open 01-webserver-template.yaml from previous post and save as 02-autoscaling-template.yaml .
Network
The load balancer requires multiple subnets, thus we need to create another subnet for our VPC. Modify these resources:
| 1 |
PublicSubnet:
|
Add the AvailabilityZone to the original subnet. |
Then add these resources:
| 1 |
PublicSubnet2:
|
This is the new subnet. The server instances in this subnet will have the IP of 10.0.1.*. |
| 2 |
PublicSubnet2RouteTableAssociation:
|
Associate the route table to the new subnet. |
Launch Template
The auto scaling group will need to know how to launch an EC2 instance. This is defined as launch template in AWS. The structure is very similar to how we define the EC2 instance in last port. Modify WebServerInstance into this WebServerLaunchTemplate :
| 1 |
WebServerLaunchTemplate:
|
The new EC2 instance will use Amazon Linux 2 and t2.micro like the EC2 instance in the previous post. |
NetworkInterfaces:
|
This is the network interface of the EC2 instance. The auto scaling group will decide the subnet for the EC2 instance so we don't need to specify it here. It will have a public IP. | |
Groups:
|
Associate it to the security group we defined earlier so we only expose the ports we need. Note that the property name here is Groups instead of GroupSet. | |
KeyName: !Sub ${SshKeyName}
|
The rest is just like what we did for the EC2 instance in the previous post. |
Load Balancer
The load balancer will route the traffic from the Internet to the EC2 instances. Add these resources:
| 1 |
WebServerLoadBalancer:
|
This is the load balancer. It will accept the same web server traffic as the EC2 instances so we just use the same security group as the EC2 instances. It doesn't handle SSH traffic. |
Subnets:
|
It needs more than 1 subnet here to achieve high availability thus we defined 2 subnets for it. | |
| 2 |
WebServerLoadBalancerTargetGroup:
|
This is the target group of the load balancer. All the traffic will be routed to the port 80 of the EC2 instances in this target group. The auto scaling group will manage it. |
TargetGroupAttributes:
|
This is the time needed for a EC2 instance to deregister itself from the target group. This is needed so when the auto scaling group terminate the EC2 instance, it still have enough time to process the active request. | |
| 3 |
WebServerLoadBalancerHttpListener:
|
This is the listener of the load balancer. It will accept the HTTP request on port 80 and forwards it to the corresponding target group. |
Auto Scaling Group
The auto scaling group will change the number of running EC2 instances on the fly. It can do that manually or through some predefined condition (aka auto scaling). Add this to the resources:
| 1 |
WebServerAutoScalingGroup:
|
This is the auto scaling group. It will use the launch template we defined earlier to launch a new EC2 instance. |
MinSize: 1
|
It will ensure the number of running EC2 instances will be between 1 and 2. | |
VPCZoneIdentifier:
|
It will launch the EC2 instances in these subnets. | |
TargetGroupARNs:
|
It will register the EC2 instances in this target group so the load balancer can route traffic to them. |
Output
There are multiple EC2 instances now so we can't rely on the IP of the EC2 instances to access our web server. We need to use the DNS name of the load balancer. Change the outputs to this:
| 1 |
Url:
Description: URL of the web server instance Value: !Sub http://${WebServerLoadBalancer.DNSName} |
This will construct a HTTP URL from the DNS name of the load balancer. |
You can update the stack created in previous post with this stack. The CloudFormation will figure out the changes and know how to modify the existing resources and provision new resources.
Open the URL in a browser and you should see the NGINX welcome page. It might takes a while for the page to work because it takes time to spin up the EC2 instance.
Next we will do AWS CloudFormation: 03 - Collect logs .